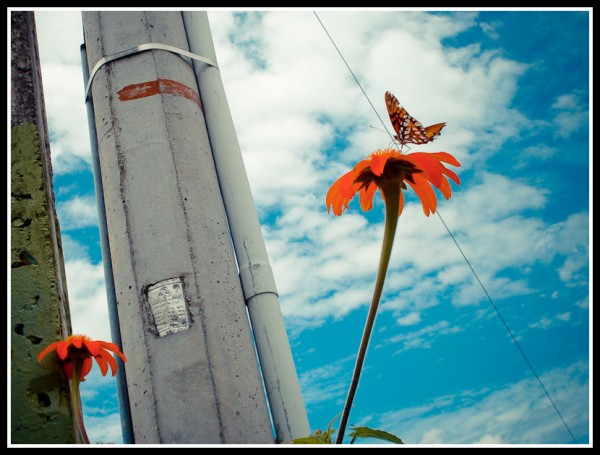
I normally talk about the importance of using a flash when taking shots into the sun to give sufficient light to add features to your subject but there are also times when making your subject featureless apart from their outline against a bright background can be most effective – or when in other words silhouette is a worth exploring.
Silhouettes are a wonderful way to convey drama, mystery, emotion and mood to the viewers of your photos and often stand out in an album because of the combination of their simplicity but also the story that they convey. I love them because they don’t give the viewer of a clear picture of everything but leave part of the image up to their imagination to wonder about.
The basic strategy you’ll need to employ in taking silhouette shots is to place your subject (the shape you want to be blacked out) in front of some source of light and to force your camera to set its exposure based upon the brightest part of your picture (the background) and not the subject of your image.
In doing this your subject will be under exposed (and very dark, if not black).
There are a lot of very technical descriptions going around on how to take great silhouette shots that you might want to look up but let me attempt to run through some basic steps that should get you the results you’re after. In essence what we’re trying to do is make your camera think that it’s the bright parts of the picture you are most interested in.
Here’s how to do it:
Get more tips for free by subscribing to our newsletter or RSS feed
1. Choose a Strong Subject
Almost any object can be made into a silhouette, however some are better than others. Choose something with a strong and recognizable shape that will be interesting enough in its two dimensional form to hold the interest of those viewing your image. Silhouettes can’t draw on the colors, textures and tones of subjects to make them appealing – so the shape needs to be distinct.
2. Turn off your Flash
If you have your camera in automatic mode your camera will probably want to use its flash which will ruin the silhouette. Basically you want as little light on the front of your subject as possible – so the flash has to go (basic – but I’ve seen a few attempted silhouette shots with the flash firing).
3. Get Your Light Right
When it comes to lighting your subject you’ll need to throw out a lot of what you’ve learnt about normal photography and think a little backwards. Instead of lighting the front of your subject, in silhouettes you need to ensure that there is more light shining from the background than the foreground of your shot – or to put it another way – you want to light the back of your subject rather than the front. The perfect light for this is placing your subject in front of a sunset or sunrise – but really any bright light will be able to do the trick.
4. Frame your image
Frame your shot so you are shooting with your subject in front of a nice plain, but bright background. Usually the best backgrounds will be a bright cloudless sky with the sun setting. You want to position the brightest light source behind your subject (either so that they hide it or so that its in the background somewhere).
5. Make silhouetted shapes distinct and uncluttered
If there is more than one shape or object in the image that you’re attempting to silhouette, try to keep them separated. ie if you are silhouetting a tree and a person don’t have the person stand in front of the tree or even leaning on it as it will merge them into one shape and as a result your viewers could be confused about what the shape is.
Also when framing you’ll probably want to photograph silhouetted people as profiles rather than looking straight on. This means that more of their features (nose, mouth, eyes) are outlined and they are more likely to be recognized.
6. In Auto Mode
Most modern digital cameras have automatic metering which are pretty good at sensing how to expose a photograph so that everything is well lit. The problem with this is that most cameras are so smart that they will light up your subject instead of underexposing it to get a silhouette so you need to trick it. Most cameras work out the exposure levels in auto mode when you push your shutter half way down (at the same time that they focus). So point your camera at the brightest part of your picture and then press the shutter halfway down (don’t let go). Then move your camera back to frame your shot with the subject where you want it and then finish taking the shot. With most digital cameras this will result in a silhouetted subject. In effect what you’re doing is tricking your camera into thinking that the bright part of the image is the mid tone of it so that anything darker than it will be exposed as a nice dark shadow.
Some digital cameras also have ‘spot’ or ‘centered’ metering modes that you can switch on which helps with the above technique as they will set the metering on the central spot of your frame rather than multiple spots. This means you can accurately tell your camera exactly which bit of the bright background you want it to set the exposure on.
7. Manual Mode
If this technique doesn’t work and your camera has controls to allow manual exposure or exposure compensation you might like to try some of your own settings. The beauty of digital is that you can experiment to your hearts content until you get the result you’re after.
A simple way to start using manual mode is to look at the shutter speed and aperture that it suggests in automatic mode and to start from there. If in auto mode your subject is too light (ie you need to make it darker) stop down the shutter speed a stop or two and see what impact that has. Use the ‘bracketing’ technique that I described in my previous tip on sunrises and sunsets to get a variety of shots at slightly different exposures.
8. Focusing
In most cases you’ll want the subject which is silhouetted to be the thing that is in focus most crisply. This can mean that the process described in point 4 can be a little tricky as pushing your shutter half way down to get the metering right also means that you’ll focus on that spot in the background. To get around this you can use two strategies. Firstly if your camera has manual focusing you might want to try that. Pre focus your shot before you meter your shot.
The other strategy is to use Aperture to maximize your depth of field (the amount of your image that is in focus). Set a small aperture (ie a larger number) to increase the depth of field – this means you’re more likely to have a sharper foreground and background in your shots.
One last tip on Silhouettes – while a total silhouette with a nice crisp and black subject can be a powerful shot, also consider the partial silhouette where some detail of your subject is left. Sometimes a touch of light on them makes them slightly more three dimensional and ‘real’. This is the beauty of bracketing your shots as it will leave you with total and partial silhouettes to choose form.
COMPOSITION TIPS
Composition Tip #1. The most important tip for composition in digital or film photography is: understand composition. Composition is how you arrange the elements of your photograph in such a way that you convey the message or the mood that you intend to convey. In a portrait, do you want to convey happiness, loneliness, wistfulness, anger, boredom, honesty, intelligence? In a landscape, do you want to show tranquility, drama, vast spaces? The way you convey these ideas is through composition. The rest of these tips will help you compose better photos.
Composition Tip #2. Covered in another article, the Rule of Thirds is based on placing an imaginary grid of two vertical and two horizontal lines evenly dividing the frame up into 9 rectangles. Place the key center of attention close to one of the points of intersection. Place key vertical or horizontal lines along or close to one of the dividing lines. This helps get away from a static composition to add tension, excitement, motion and action to your photos.
Composition Tip #3. Get in closer. Snapshots taken by many untrained photographers have a tiny subject with vast unnecessary space around it. The photo is of mom but you need a magnifying glass to find her among the other people and the litter on the beach. Get in close, make the subject BIG in the frame, and when you think it’s big enough and you’re close enough, take another step closer before you press the button.
Composition Tip #4. Look for and remove distracting elements from the photo or move the subject to avoid them. The family is taking a picnic but there is a large garbage can in the photo. Move it if you can or, If you can’t, move your subject to leave the garbage can out of the photo.
Composition Tip #5. Try not to cut off people’s limbs or heads, or important parts of your subject, unless you have good reason to. Half an arm, leg or head can look a bit strange. This doesn’t mean you can never cut a subject off. Just pay attention to how you do it.
Composition Tip #6. Beware of the position of your subject, particularly a human subject, to make sure that they are not placed in front of something which then appears to be growing out of their head. This is pretty corny, but the number of photos that have a telegraph pole or tree or potted plant growing out of their heads is considerable.
Composition Tip #7. A great way to show more about a person and their character is to place them in surroundings which have something to do with their life or activities. If Grandma is known for her terrific crochet work, you might consider sitting her with her crochet needle and pattern in hand. Kids playing with their toys, a musician with his or her instrument and so on, these things all add to the message.
Composition Tip #8. Avoid splitting the viewer’s attention between two or more centers of attention. Try not to have a competing subject in the photo that will draw attention away from what you want the viewer’s attention on.
Composition Tip #9. There are many ways to focus the viewer’s attention on where you want it in the photo. One of these is to use depth of field. By adjusting your aperture, you can make sure that much of the photo in front of and behind your subject is out of focus, while your subject itself is in sharp focus. Another method is to arrange lines of perspective so that they come to a point at or near your center of attention.
Composition Tip #10. Important tip. Only use tips 2 - 9 above if they help you make a better photo. Don’t for a moment feel bound by any of these rules. Take them as tools Use Fill Flash
If your camera has a flash, there are many instances when it can be used and you may not have thought of them. For instance, you’re on a tour with a set schedule and have no other option than to take photos of your family in front of the pyramids of Egypt at noon. Harsh, harsh sun is beating down. Everyone, rightfully, has a hat on their head to block the sun. The only problem is their faces are now in deep shadow while the pyramids are harshly lit. Did I mention the harshness in this setup? In this scenario adjusting exposure, as in the item above, will not help because the pyramids will become washed out while the faces become visible. What do you do?
Use your flash! That’s right, in the middle of the day, use your flash. Most cameras have a “Fill-Flash” setting and even if they don’t, a full flash will be better than none. A fill flash is just that; a flash to fill in the areas of the scene in dark shadow. Suddenly your family’s faces can be seen beaming with joy from under their hats before rushing back to the air conditioned tour bus. The photo at right has a subtle fill flash used to overcome the very dark shadows on my daughter’s face. While more edits can be made in Photoshop, starting with a more even exposure helps in post processing.
Another handy use for fill flash is when a subject is backlit. Maybe the sun or a bright light is behind them. Fill flash to the rescue! The bright light will still be there, but now faces and features can be seen as well.
Use A Long Lens
300mm x 1.6 = 480mm. Don"t get too close.
This last bit of advice might not seem obvious at first. While wide angle lenses are great for panoramic shots and big features, a zoom lens, something that is 100mm or greater, will do wonders for your photos. Zoom in on details and features of those grand, wide images. Use the zoom to help isolate your subject so the scene becomes less cluttered. And use a zoom to help capture those stalking lions far out on the savannah.
If you don’t have a zoom lens readily packed for travel, consider renting one. There are many places online and possibly in your town, that will rent a lens for a fraction of the price of purchasing it new. It’s often worth the cost if your once-in-a-lifetime trip will require it.
Lastly, Break All The Rules
Once you have learned the rules and how to use some of these tips, break them when the situation calls for it. Travel photography is about artistic expression so go with what feels good to you. But first, learn the Rule Of Thirds before you move your subject just a bit further to the side. Learn to use a fill flash before you decide having a dark, silhouetted face works better and don’t be afraid to take some details shots during the middle of the day even in the harsh sunligyou can use if you want to, but only so that you can get a better photo
Get Up Early And Stay Out Late
Waking up at 6am is worth it.
The Golden Hour, that slice of time just after sunrise and just before sunset, is a tried and true method for taking great photos. Photography, after all, is the art of capturing light, so get it when it’s at its peak, low on the horizon and full of color. There are also deeper shadows and contrast during these times giving photos a punch. The mistake most of us make is taking photos of great landmarks, like the Eiffel Tower, during midday when the sun is high and harsh. Do all you can to avoid photos during midday. Colors become washed out and lifeless. Shadows disappear or cover faces in an unattractive manner. If you have the luxury of extra time at a location, take advantage of the light when the sun is lower on the horizon and you’ll come back with dramatic scenes.
Use The Rule Of Thirds
Imagine a grid on your screen or eyepiece. It is made up of two lines, equally spaced, extending from top to bottom and another two from left to right. A small grid with four intersections. These intersections are the start of a simple method for making your photos more interesting. What you will need to do is place the main focus (pun intended) of your photograph in one of those intersections. If the main subject is someone’s face, place one of their eyes at an intersection. If it’s a mountain, place the peak near an intersection. Interesting bug on the ground? Don’t just center it in the photo and click away. Boring! Place it on an intersection and give it room (meaning, if it is facing left, place it on the right side of your photo so it visually has room to move into the photo).
More on the Rule Of Thirds can be found here.
Get The Horizon Out Of The Middle Of Your Picture
Along with the Rule of Thirds, never, ever, never place the horizon in the very center of your screen. While it may seem logical at the time, when you view a photo taken this way, it will appear bland and unnaturally balanced. Get that horizon off the center one way or the other! I prefer to give more foreground space and less sky, but there are times when more sky is needed. It works well to use one of those grid lines explained earlier in the Rule Of Thirds as a location for your horizon, but there’s no pat answer. Play around a little, but please, no more centered horizons!
Learn How To Change Your Exposure Settings
This one may be a bit trickier but is worth it. Background: Your camera is not perfect. Neither is mine. No matter how much money you spend, cameras have their limits. In most automatic modes a camera will take a look at the scene in front of them and try to find an average setting that lets all the highlight areas be seen and the shadows as well. The problem with this approach is cameras are not human eyes and don’t have the wonderful range our eyes (and brain) do. A scene may be 40% dark and 60% bright and the camera comes to middle ground on its choice.
A Post by Mitchell Kanashkevich – author of our brand new eBook, Natural Light: Mastering a Photographer’s Most Powerful Tool.
Natural light is the most important and powerful tool available to photographers, and it is free to everybody in the world. Understanding how natural light works and how to work with it effectively is one of the key ways in which all of us can improve our photography without spending more money on fancy photographic equipment. In this blog post I’ve outlined five tips which I believe to be most vital to improving the way we work with natural light and in turn improving our photography.
Before getting to the tips I want to draw attention to one very important fact. We take photos to communicate visually. With our photographs we aim to tell stories or to convey a mood, an atmosphere—what it was like to be at a place or with a certain person. This fact is very important to keep in mind because it helps us put everything in perspective. It helps us realize that ultimately our use of natural light is nothing more and nothing less than one of the means to communicate visually.
1. Be Aware that Characteristics of Natural Light Change
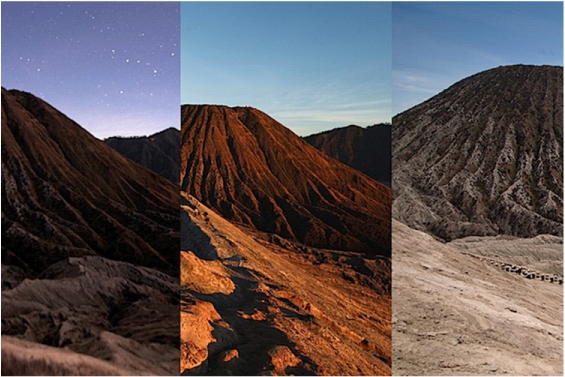
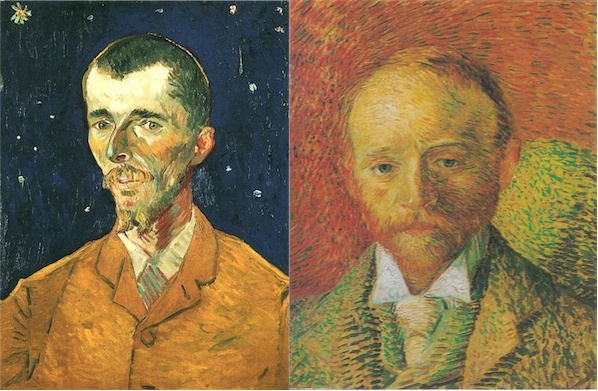
The characteristics of natural light change due to the time of day, because of the weather and due to various other circumstances. You can essentially say that there are different kinds of light. The different kinds of light will make the same scene will look quite different, as you can see in the photographs above, which were taken during different times of day (left – twilight, middle – sunrise, right – middle of the day).
To the photographer this means that if a scene doesn’t look the way you’d like it to look at the time of day or in the weather you initially see it, you may have a chance to capture it looking entirely different at another time, in another kind of light.
2. Don’t Look at Natural Light in terms of “Good” or “Bad”
Many of us are virtually indoctrinated with the idea that light during the golden-hour is “good” or even the best kind of light to photograph in. The harsh light around midday is generally considered to be the worst kind of light. In reality, this way of looking at light can be very limiting creatively.
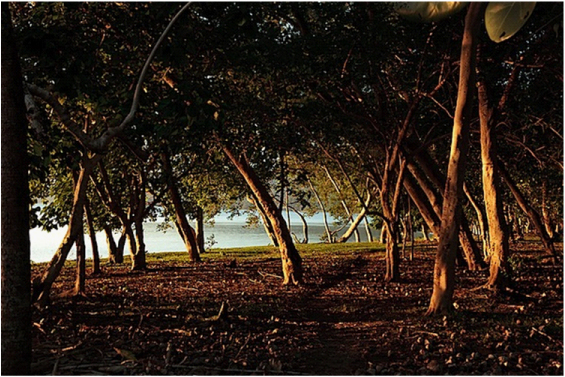
The golden-hour light makes everything look beautiful and magical because of its soft and golden tinting qualities. The image above is a great example of the golden-hour light beautifying a scene. But, what if we want to create an image which isn’t about the beauty of a place or a person? Golden-hour light might not be appropriate in such a situation.
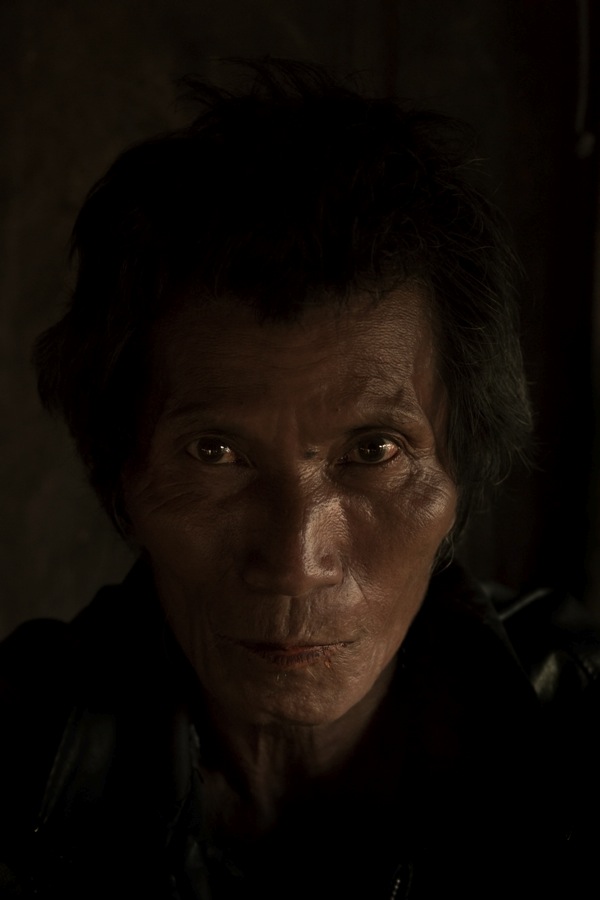
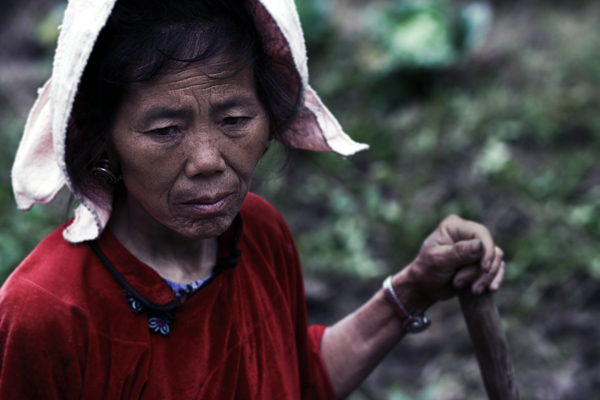
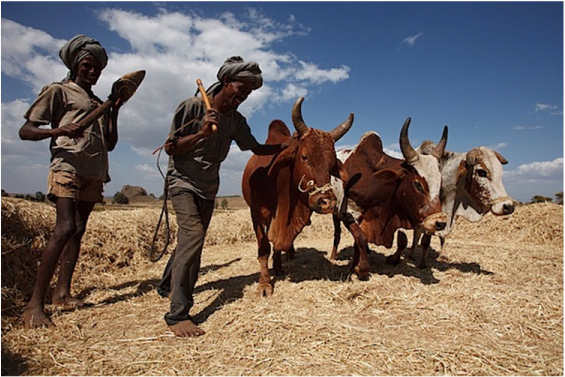
The above image is a good example of when the harsh light around midday might be the preferred kind of light. With this photograph I primarily wanted to communicate what it’s like to be working in a harsh, sun-bleached environment. I wanted to say something about the hardship of manual labor. If the image were shot during the golden-hour, the scene may have been beautified and romanticized and the message may have very possibly been lost. In the harsh midday light, the hard shadows and the bleached colors helped me communicate exactly what I wanted to.
In conclusion my advice is to look at the different types of natural light as tools in a tool-set. None of the “tools” are good or bad, just right or wrong for what you’re trying to communicate.
3. Obsess with Observing Light
Observe light in your everyday life—how it interacts with everything around you, with particles of dust, water, observe how is changes when you move from place to place, how it casts shadows. Observe how the photographers you respect use light in their work. The aim is to educate yourself, to train your eyes to recognize different lighting scenarios and eventually to be able to predict when some of the more elusive lighting scenarios might occur.
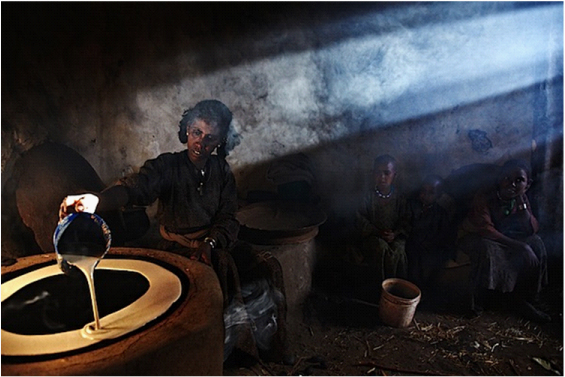
The photograph above came to materialize because I had observed similar lighting scenarios before. I knew that narrow light sources and smoke can create dramatic looking light-beams, when the light illuminates the smoke at a certain angle. In this situation the sun was setting, hence it was illuminating the smoke at just the right angle for the “light-beam-effect.” I had a narrow light source, the doorway, which I was able to make even more narrow by asking my friend to block most of it, hence accentuating the effect.
4. Experiment and Photograph just for the Sake of seeing how Everything will Translate Through the Viewfinder
No matter how much you observe natural light or how many tips you read about it, to truly make the most of it photographically, you need to take photos.
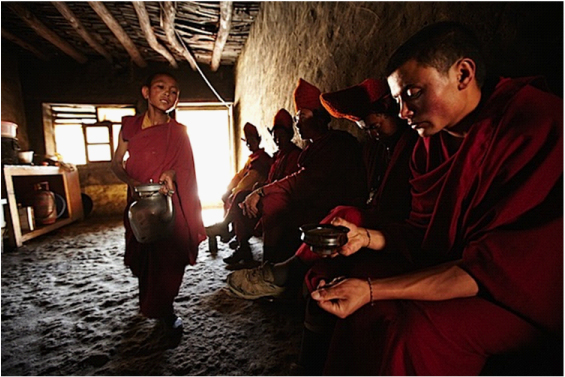
Experimenting doesn’t necessarily lead to masterpieces, but it does help you understand how light works in a very practical sense. With digital cameras there is absolutely no reason to hold back frames. If you see an interesting lighting scenario and you’re wondering how it would look in an image—photograph it! That’s exactly what I did with the above frame. I saw that the scene was backlit, but at the same time light was coming from behind me. The first thought that entered my mind was “I wonder how this might turn out?” I experimented, made a few exposures and ended up with what I consider a strong image.
5. Expose with Post-Processing in Mind
No matter how good our cameras are, we will not be able to capture the entire tonal range created by some of the more challenging lighting situations, without the aid of post-processing software such as Adobe Lightroom.
To make the most of such situations it’s important to expose in a way where you give yourself a chance to capture maximum detail. This might mean under- or over-exposing certain elements in a scene. Let me explain using an example.
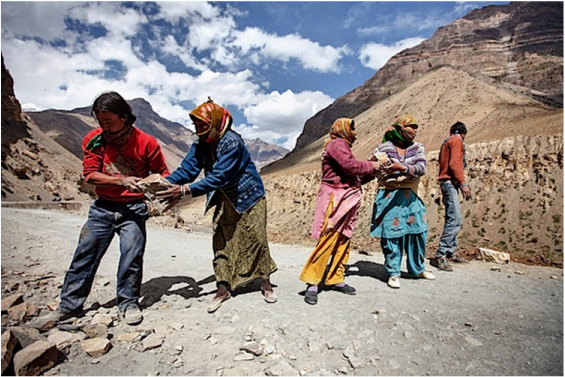
You can see in the first image above that the faces of the men are looking dark, they are under-exposed. This is the image that came straight from the camera and my decision to under-expose was very deliberate. Exposing properly for the faces would result in extremely over-exposed clouds. In this case I would likely be unable to bring out the detail in those over-exposed clouds and they would become large, white blotches. On the other hand I knew that I could brighten the faces of the men and bring out the necessary details in Lightroom with a simple tweak of the Fill Light/Shadows slider.
Exposing with post-processing in mind is a bit of a mental battle. You constantly have to ask yourself: Which element is more important to the image? What are the details which I can afford to lose and which are those which I can’t? Ultimately there might be situations where details cannot be preserved by under- or over-exposing and until the photographic technology gets better, that is just something we have to live with.
Some Final Words
As I already mentioned, no matter how much we read about photography, to become a better photographer—nothing beats actually making photos. The best way of improving and bettering your understanding of natural light is to keep the above mentioned tips in mind and to photograph as much as you can, in as many different lighting scenarios as possible.
How to Teach and Introduce Children the Wonders of Photography
Children see the world through a special lens. There is a purity to their imagination that at some point most adults lose. If you have ever put a camera in the hands of a child you will soon discover that what they see in life is very different than the adults perspective.

How can you harness the creativity of a child through photography? I recently embarked on an experiment to this very goal. As I taught this group of children, I found myself learning lessons also, and am very happy to share some tools that will help you do the same.
1. Simplify, Simplify, Simplify
Adults like complicated things. We like to complicate everything too. To teach photography to children you must get out of this mindset. The most important element in your teaching children is that they understand a single concept first – and understand that well. From this foundation you can build upon other elements slowly.
2. Start with the Basics
The most important concepts in photography are universally known to be “Fill the Frame” and “Rule of Thirds“. In theory, you could combine these two ideas into a single session, but once again keeping with the “Simplify” concept, it works very well to do each as a single session. Begin with “Fill the Frame”, and emphasize that above all your subject must fill the frame to remove distractions. It’s ok to show examples of subjects quite literally “filling the frame” with very few other elements. Once they practice and master the idea of removing distractions, you can go on to explain that other elements can be in the picture to support your main subject.
3. Allow 30% Theory and 70% Practice
Kids will only sit still for so long before their focus diverts. For this reason spend the majority of your time allowing the kids to practice. You don’t have to send them out on a photoshoot; you could bring a bag of random objects and allow them to play right inside your classroom. Assign them a number of photos, and encourage them to come back to you for feedback. Invaluable practice comes from re-shooting the same subject to get the concept down.
 Taken bhttp://www.malaphotogallery.com/y a Columbian Orphan
4. Repeat, Repeat, Repeat
Don’t be afraid of saying the same phrases multiple times to be confident the concepts have stuck. Have the kids repeat the phrases back to you. Explain the same phrase in different ways, and do so multiple times.
5. Encourage
Kids will be kids, and they won’t always get things the way you hope they would. The most important thing you can do as you teach is to encourage their creativity. Don’t point out all the things that are wrong. Point out one thing that they can improve upon, and encourage all the things you see them doing well with their photos.
6. Have Contests to Spur on Creative Excitement
Everyone likes to compete. Set a contest for “most colorful” or “most interesting”. Give an appropriate amount of time for their goal. When the kids come back from shooting, walk them through the creative elements of their photos. Foster team spirit by having the kids vote on which photo most fulfills the contest.
Not everyone is cut out to be a teacher. But everyone can invest in the lives of children and inspire the next generation of creative artists. You never know who will grow up to become a well known and appreciated photographer because you gave them the first opportunity.
A wise landscape photographer friend once said to me...
"Photograph the light--not the land. When you learn to see and photograph light your photography will be transformed."
My friend"s words changed my approach to photography -- not only for landscapes but also for my day-to-day photography, particularly my portrait work.
Learning to see and shoot in all kinds of light is arguably the single most important skill a photographer can develop.
That"s why I"m so passionate about our latest eBook - Natural Light: Mastering a Photographer"s Most Powerful Tool.
Seascape Photography Tips
by Guest ContributorX
One of my favourite places to shoot is the coast due to its variety and ease of access. I’m fortunate to live in a country such as New Zealand which has an abundance of beaches, even in a big city like Auckland. Here are some tips on how to capture beautiful photos at the beach.
Composition
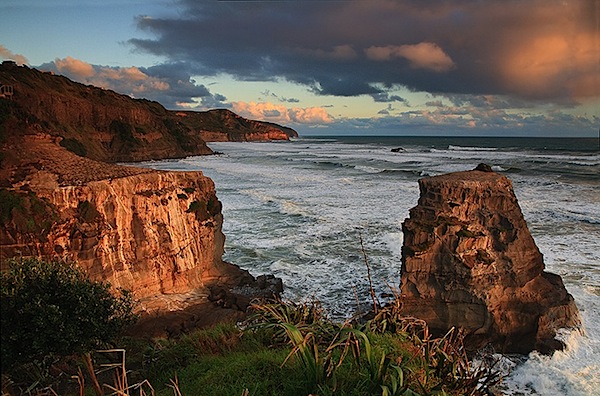
Like all landscapes, including some foreground interest is important in order to produce an interesting photo. One way to do this at a beach is to look for interesting rocks or rock formations and use those as your foreground interest. However don’t just find a rock and stick it randomly in your photo – try and find some sort of pattern or structure to lead the viewer into the shot. Experiment with different points of view – e.g. try placing the camera at different heights and angles – to see what works best.
Below is a shot with the camera about chest height and pointing down to accentuate the shape of the rock pool. Having the camera lower would have ‘flattened out’ the rock pool, and having the camera higher would restrict the amount of sky I could have included.

Here I found some old tree roots that I found really interesting. I got the camera low down and very close to the foreground to take this shot, using a wide angle lens to exaggerate the tree roots.

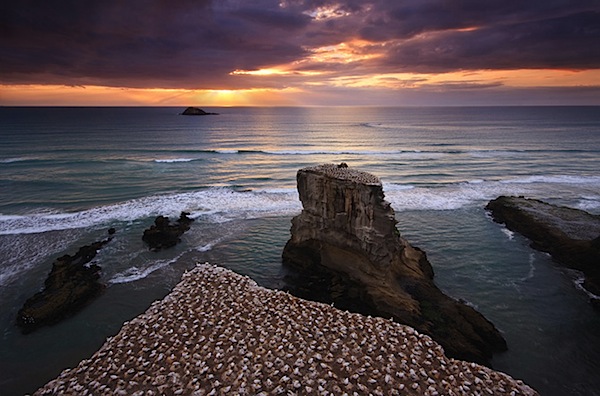
Some beaches offer great views from the cliffs above and these can make for some great shots. Including large rock formations or cliff faces in the foreground really work well for these types of shots. The below shot was taken above a gannet colony, and I found the inclusion of the gannets nesting on the rocks also gives a sense of scale.
Sometimes it’s best to keep things simple. Wet sand can offer gorgeous reflections and this is best with an outgoing tide as there are fewer footprints to worry about.

Of course, that’s not an exhaustive list of the types of shots you can get near the sea. One of the main reasons I love seascapes is just the variety you can get from different beaches. Or even the same beach at different tides.
And don’t be afraid to get your feet wet. Sometimes the best compositions are those taken from in the water!
Shutter Speed
Another important factor to consider with seascapes, or any photos containing water, is shutter speed, as this often has a significant impact on the overall look of your photo.
A faster shutter speed will freeze the action and will therefore show the water without any motion blur. Depending on how fast the water is moving, this is typically anything from 1/20 sec and faster. This is the most realistic way to capture water and would be what non-photographers would expect to see. But we know photography isn’t always about realism!
The below photo was taken at 1/50 sec and as you can see this was fast enough to freeze the movement of the water.
Slower shutter speeds will blur the water to varying degrees. Again it depends on how fast the water is moving, but I find that shutter speeds of around 1/2 sec will show some motion blur while still retaining a reasonable amount of detail of the water. This shot was taken at 1/3 sec and captured the splash of the water against the rocks while still getting some motion blur.

Once the shutter speed goes above 1 second the water starts to give the foggy/milky effect that is quite popular. Although some people dislike this effect, I love using it in my photos. The below shot was taken using a shutter speed of 4 seconds.

The shutter speed you choose is usually down to personal preference. Sometimes it’s dictated by the light (e.g. before sunrise or after sunset the light is too low to use a fast shutter speed) but often it depends on how you want the photo to look. I find it’s also a case of trial and error, so don’t be afraid to mix it up a little and experiment.
Filters
The two types of I filters I commonly use for seascapes are graduated neutral density (GND) and neutral density (ND) filters.
GND filters are used when the dynamic range of a scene to too much for the camera’s sensor. This is often the case at sunrise and sunset when the sky is much brighter than the foreground. A GND filter is dark at one end and clear at the other end, with a gradual transition in between. The dark end is placed over the brighter part of the scene (e.g. the sky) so that the exposure is balanced with the brighter part (e.g. the foreground). An alternative to using a GND filter is to take multiple exposures and blend them together with post-post- processing but I prefer to get it in one shot where possible.
ND filters are used to reduce the amount of light hitting the camera’s sensor. They are useful when you want to use a longer shutter speed than the light would normally allow. ND filters come in different strengths, commonly around 3-stops (reducing light by 8 times) but can go all the way to 10-stops (reducing the light by 1024 times).
The below shot was taken using a 10-stop ND filter. The sun was just rising above the horizon so conditions were quite bright, but the filter allowed me to use a shutter speed of 60 seconds.


 The digital camera is another great example of a technology we take for granted. Because we had film-based cameras for so long, the idea of capturing an image isn’t that miraculous to us any more. So, with the natural progression of technology making picture taking more and more instant, we all seemed to just kind of think, “Of course we can take digital photos.” without questioning how it works.